How to Map Acumatica Stock Items to Shopify Products
Manufacturers using Acumatica ERP maintain their product catalog as stock items. When selling through Shopify, these items need to sync accurately, with the right visibility, availability, and product attributes appearing in your store.
The Acumatica-Shopify connector handles this synchronization, but getting it right requires understanding how stock item fields map to Shopify product fields and how to configure settings for different scenarios. This guide covers the mapping process from Acumatica stock items to Shopify products.
Understanding the Stock Item to Product Relationship
In Acumatica, stock items are inventory-tracked products defined on the Stock Items form (IN202500). Each stock item has:
Inventory ID and description
Item class assignment
Pricing and cost information
Attributes and specifications
Warehouse and location data
When synchronized to Shopify, stock items become products with:
Title and description
Variants and SKUs
Pricing
Inventory quantities
Product tags and categories
The connector maps fields between these two systems, with options to customize what syncs and how.
Activating Stock Item Synchronization
Before mapping fields, enable the Stock Item entity for synchronization.
Enable the Entity
On the Shopify Stores form (BC201010):
Navigate to the entity settings
Activate the Stock Item entity for export
Optionally activate Non-Stock Item if you also sell services or non-inventory products
With entities activated, you can configure how items sync and which fields map between systems.
Default Store Settings for Products
Configure default settings that apply to all exported items unless overridden at the item level.
Default Availability Settings
On the Inventory Settings tab of the Shopify Stores form (BC201010), set how product availability syncs:
Default Availability:
Set as Available (Track Qty.): Products show as available and Shopify tracks inventory quantities
Set as Available (Don't Track Qty.): Products show as available without quantity tracking
Do Not Update: Availability settings in Shopify remain unchanged
Set as Unavailable: Products sync but show as unavailable
When Qty. Unavailable:
Do Nothing: Keep product visible even at zero quantity
Set as Unavailable: Hide or mark unavailable when stock depletes
Set as Continue Selling: Allow orders even when quantity shows zero
Choose settings based on your inventory strategy. Manufacturers with made-to-order products might use "Continue Selling" while those with fixed inventory use "Set as Unavailable."
Default Visibility Settings
Control whether products appear in your store:
Default Visibility:
Visible: Products appear in store and search results
Invisible: Products sync but don't appear to customers
Sales Category Export:
Do Not Export: Categories don't sync as product tags
Export as Product Tags: Acumatica sales categories become Shopify product tags
Exporting categories as tags helps with store navigation and filtering.
Individual Item Settings
Override default settings for specific items when needed.
Item-Level Export Settings
On the eCommerce tab of the Stock Items form (IN202500), configure per-item settings:
Export to External System: Enable or disable export for this specific item
Visibility:
Store Default: Uses the default visibility setting
Visible: Always visible regardless of default
Featured: Visible with featured status
Invisible: Hidden regardless of default
Availability:
Store Default: Uses the default availability setting
Set as Available (Track Qty.): Track inventory for this item
Set as Available (Don't Track Qty.): Available without tracking
Set as Pre-Order: Mark as available for pre-order
Set as Unavailable: Not available for purchase
When to Use Item-Level Settings
Override defaults for items that need different treatment:
New products: Set to invisible until ready to launch
Discontinued items: Set to unavailable while keeping the record
High-demand items: Enable continue selling for backorder capability
Custom/made-to-order: Don't track quantity
Mapping Fields Between Systems
The Entities form (BC202000) controls how Acumatica fields map to Shopify product fields.
Standard Field Mappings
The connector includes default mappings for common fields:
These standard mappings work for most scenarios without modification.
Custom Field Mappings
Map additional fields when needed. For example, if you maintain external inventory IDs in a custom field (like UsrExtInvID), you can map that to Shopify's SKU field instead of using the internal Inventory ID.
To add custom mappings:
Open the Entities form (BC202000)
Select the Stock Item entity
Add field mappings for custom fields
Use the "Usr" prefix for user-defined fields
Unmapping Fields
Remove standard mappings when you don't want certain fields to sync:
Unmap price if you manage pricing separately in Shopify
Unmap description if you maintain different content per channel
Unmapped fields remain unchanged in Shopify during synchronization.
Formula Support
Use formulas for field transformations:
Concatenate fields for richer descriptions
Calculate values based on multiple source fields
Format data for Shopify requirements
Mapping Attributes to Shopify Fields
Product attributes in Acumatica can map to Shopify product fields, variants, or metafields.
Setting Up Attribute Synchronization
The process involves several steps:
1. Create the Attribute
On the Attributes form (CS205000):
Define the attribute (e.g., Product Type, Material, Voltage)
Set the attribute type and values
2. Add Attribute to Item Class
On the Item Classes form (IN201000):
Select the relevant item class
Add the attribute to the class
Items in this class can now have this attribute assigned
3. Assign Values to Items
On the Stock Items form (IN202500):
Open the stock item
Assign values to the item's attributes
4. Map Attribute to Shopify Field
On the Entities form (BC202000):
Map the attribute field to the corresponding Shopify product field
Attributes can map to product tags, metafields, or variant options
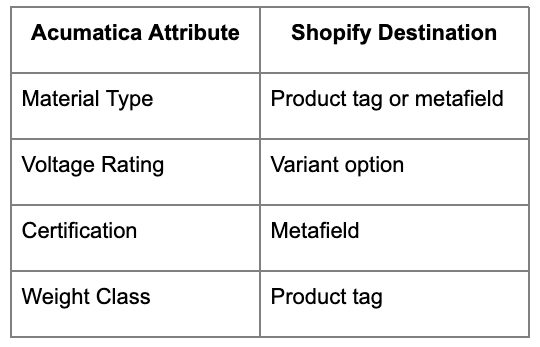
Attribute Mapping Examples
Plan your attribute strategy based on how customers will filter and find products.
The Synchronization Process
Once configured, synchronization happens in two phases.
Prepare Data
On the Prepare Data form (BC501000):
Select the Stock Item entity
Choose items to prepare (all, selected, or filtered)
Run the prepare process
This stages data for synchronization, identifying what needs to create or update in Shopify.
Process Data
On the Process Data form (BC501500):
Review prepared records
Check for any errors or warnings
Process the synchronization
Items sync to Shopify based on your mapping and settings configuration.
Synchronization Triggers
Synchronization can run:
Manually: On-demand through the Process Data form
Scheduled: Automated at defined intervals
Real-time: Triggered by changes in Acumatica (if configured)
For initial setup, run manual synchronization to verify mappings before enabling automation.
Sales Categories and Product Organization
Acumatica sales categories can help organize products in Shopify.
How Category Export Works
When "Export as Product Tags" is enabled:
Assigned sales categories export as Shopify product tags
Only exported categories appear on the Shopify product
If an item has no categories assigned, default categories apply
Category Strategy
Plan your category structure:
Use categories that make sense for online shoppers
Consider how tags affect Shopify collections and filtering
Keep category names consistent and customer-friendly
Handling Stock Items with Variants
Some stock items represent products with variants (size, color, configuration).
Matrix Items
If using Acumatica's matrix item functionality:
The template item becomes the parent product
Matrix items become Shopify variants
Attributes drive variant options
Manual Variant Mapping
For items not using matrix functionality:
Group related items under a single Shopify product
Map variant-defining attributes appropriately
Configure pricing per variant
Best Practices for Manufacturers
Start with a Test Set
Before syncing your full catalog:
Configure mappings and settings
Select a small set of representative items
Sync and verify results in Shopify
Adjust configuration as needed
Scale to full catalog
Maintain Data Quality in Acumatica
Shopify product quality depends on Acumatica data quality:
Complete descriptions before syncing
Assign appropriate categories
Populate attributes consistently
Verify pricing accuracy
Document Your Mappings
Keep records of:
Which fields map to which
Custom field purposes
Attribute mapping decisions
Override settings for specific items
This documentation helps troubleshoot issues and train team members.
Plan for Ongoing Maintenance
After initial sync:
Monitor synchronization logs for errors
Review new items before enabling export
Update mappings when adding new attributes
Periodically audit Shopify products against Acumatica
Troubleshooting Common Issues
Items Not Appearing in Shopify
Check:
Export is enabled for the item
Visibility is set to Visible
Synchronization has processed
No errors in Process Data results
Wrong Data in Shopify
Check:
Field mappings are correct
No conflicting override settings
Custom fields have "Usr" prefix
Formula mappings calculate correctly
Inventory Not Matching
Check:
Availability is set to Track Qty.
Correct warehouse/location is syncing
Inventory synchronization is enabled
Timing of last sync vs. inventory changes
Related Configuration
Stock item mapping is one part of the Acumatica-Shopify integration. Related topics include:
Mapping stock items correctly ensures your Shopify store reflects your Acumatica product catalog accurately. Take time to configure default settings, plan your attribute strategy, and test with a subset of items before scaling to your full catalog.

.png)
.png)

.png)
